
Samsung Galaxy A5 Running Lollipop
In this post, were going to show you a step-by-step method that you can use to get TWRP recovery and root access on a Samsung Galaxy A5 after you have updated it to Android Lollipop.
The Galaxy A5 was released back in December of 2014. It originally ran on Android 4.4.4 KitKat but was updated to Android 5.02 Lollipop and is expected to get an update to Android 5.1.1 Lollipop.
The Galaxy A5 was originally easily root-able when it was running Android 4.4.4 KitKat, not so much with Lollipop. A custom kernel is now required to root a device running Lollipop. What you can do is flash a custom kernel with a custom recovery and then flash SuperSu.zip to root a device running Lollipop.
In this guide, were going to show you how to install TWRP recovery on a Galaxy A5. By flashing this recovery, you will also be able to root the Galaxy A5. Follow along.
Súkses jo apparaat:
- This guide is works with the Galaxy A5 A500FU, A500G and A500M and should work on other variants of this device as well.
- Charge the device to up to 50 percent to prevent it from losing power before the process finishes.
- Skeakelje jo wichtige kontakten, sms berjochten, oanmelden en media ynhâld.
- Turn off Windows firewall first.
- If you have Samsung Kies, uninstall it first.
- Hawwe in orizjinele datakabel dat jo brûke kinne om de ferbining te meitsjen mei jo tablet en de kompjûter.
- Download en ynstelde minimal ADB- en Fastboot-bestjoerders as jo in PC brûke. As jo in Mac brûke, kinne jo ADB- en Fastboot-bestjoerders ynstalleare.
Opmerking: De metoaden dy't nedich binne om oanpaste ferwidering, rom en jo tillefoan te rootjen, kinne resultearje yn mitseljen fan jo apparaat. Rooten fan jo apparaat sil ek de garânsje ferheegje en it komt net langer yn oanmerking foar fergese apparaatsjinsten fan fabrikanten as garânsjeproviders. Wês ferantwurdlik en hâld dizze yn gedachten foardat jo beslute om jo eigen ferantwurdlikens troch te gean. Yn gefal dat in ûngelok optreedt, moatte wy as de fabrikanten fan apparaten nea ferantwurdlik steld wurde.
Download:
- Samsung USB-stjoerprogramma's
- Odin3 v3.10.
Install TWRP Recovery and Root Galaxy A5 running Lollipop
- Iepenje Odin3 V3.10.6.exe
- If there is an OEM Unlock option in your phone, then enable it. Go to settings > about device > tap the build number for 7 times to enable developer options. Return to settings, open developer options and turn on “OEM unlock.“
- Put device in download mode now. Turn it off completely then turn it on by pressing and holding down the volume down, home and power buttons. When the phone boots up, press the volume up button.
- Connect the device to your PC. If the connection is made properly, you should see the ID:COM box on Odin’s top-left corner turn blue.
- Click the AP tab in Odin
- Select the downloaded twrp-2.8.7.0-a5ultexx-11112015.tar.md5 Odin will begin loading the file.
- Make sure that Odin3 looks like this. The only option ticked should be F. Reset Time.
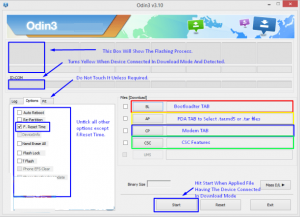
- Click the start button and the recovery will flash.
- When the process box located above the ID:COM has a green light, flashing is finished. Disconnect the device.
- Turn off the device and boot into recovery mode. Turn on the device by pressing and holding the volume up, home and power buttons.
- From recovery, choose Install> locate SuperSu.zip and flash it.
- Reboot your device by using TWRP’s reboot option.
- Kontrolearje dat jo SuperSu hawwe yn jo appfakje.
- Ynstallearje BusyBox fan Play Store.
- Verify root access meiRoot Checker.
Have you rooted your Galaxy A5?
Diel jo ûnderfining yn ûndersteande kommentaar.
JR
[embedyt] https://www.youtube.com/watch?v=JpHn32sH0vk[/embedyt]


